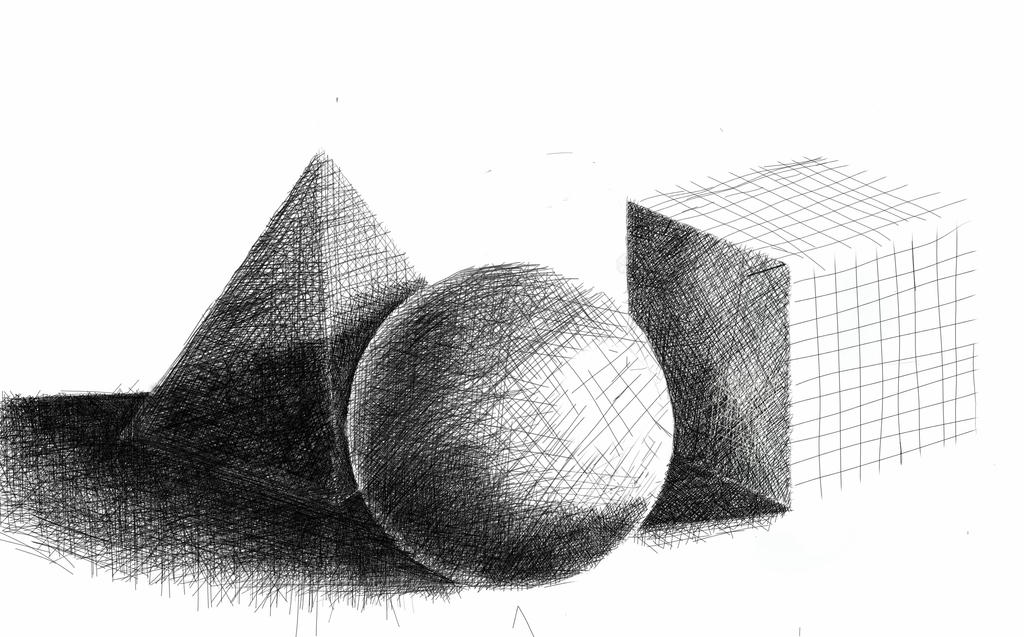
Hatching and Cross Hatching
Hatching with charcoal pencils adds depth and texture to your drawings. Draw parallel lines close together, but not overcrowded. By adjusting the spacing, you control light and shadow, creating varied tones that bring your scene to life.
When hatching, use soft strokes and let each line breathe. Subtle pressure changes add richness to the texture. For example, when shading a pear's curve, let the lines follow the contour naturally.
Cross hatching takes this technique further. Lines crisscross to add more depth and texture. Imagine drawing a tree trunk's bark:
- Start with vertical lines for basic texture
- Add horizontal lines, weaving over the first set
- Introduce diagonal lines for more intricacy
Vary the density of your lines. More intersections create darker tones, while sparse cross hatching keeps things light. Balance is key—too much can overwhelm, too little might lack impact.
Experiment with pressure. Firmer hand creates stark contrasts, while softer strokes blend transitions gently. Let each stroke contribute to your drawing's story, weaving tales of light, shadow, and texture.

Blending and Layering
Blending in charcoal drawing brings your work to life. Different tools offer unique effects:
- Fingers: Provide a direct connection, ideal for soft gradients and smooth transitions. Great for sculpting folds in fabric or creating gentle shadows.
- Tissues: Perfect for large, uniform areas like skies or backgrounds. They create a seamless, dreamy quality.
- Brushes: Excel at fine details and finishing touches. Use them to refine edges of shadows or add subtle highlights.
Layering adds depth to your artwork:
- Start with vine charcoal for light, easily adjustable strokes.
- Build up with compressed charcoal for deeper, richer tones.
Each layer adds complexity to your drawing's story. For example, when drawing a forest:
- Use vine charcoal for delicate twigs and light foliage
- Blend softly with your fingers
- Add compressed charcoal for tree trunks, creating depth and solidity
The contrast between airy and dense elements brings your drawing to life, inviting viewers to explore its depths.
Lifting Highlights
Lifting highlights with a kneaded eraser adds dimension to your charcoal drawings. This technique reveals light areas by removing charcoal, creating contrast and depth.
Shape your kneaded eraser to achieve different effects:
- A point for small highlights like a glint in an eye
- A broad edge for larger areas like a cheekbone
- A flat surface for subtle lightening of broader areas
When drawing a face, focus on high points that catch light:
- Cheekbones
- Bridge of the nose
- Forehead
- Subtle areas around eyes and lips
For a street scene, use the eraser to create:
- Glistening cobblestones
- Sheen on a car's hood
- Subtle shine on wet pavement
Approach lifting highlights with care. It's easier to remove more charcoal than to add it back. Observe your subject closely and lift strategically to enhance your drawing's realism and depth.
Maintaining Clean Workspaces
Keeping your workspace clean is crucial when working with charcoal. Here are some tips:
- Use a clean sheet under your drawing hand to prevent smudges.
- Wash your hands frequently to avoid transferring charcoal.
- Consider wearing snug, powder-free gloves for extra protection.
- Organize your supplies:
- Keep materials within reach
- Create designated zones for different tools
- Avoid dragging items across your drawing
- Clean your tools regularly, especially blending stumps and brushes.
- Tilt your drawing board slightly to reduce dust settling on your work.
- Use fixative sprays to protect finished artwork. Apply in a well-ventilated area.
By maintaining a clean workspace, you preserve the delicate details and textures in your charcoal drawings, allowing your art to shine without distractions.
Mastering these charcoal techniques brings depth and life to your art. Each stroke and blend contributes to your drawing's story, inviting viewers to explore the layers within your work.
- Avery D. The Pencil: A History of Design and Circumstance. New York: Knopf; 1990.
- Mayer R. The Artist's Handbook of Materials and Techniques. New York: Viking; 1991.
- Micklewright K. Drawing: Mastering the Language of Visual Expression. London: Laurence King Publishing; 2005.


